

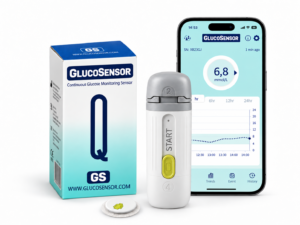
How to set up, place and use your GlucoSensor Q Continuous Glucose Monitoring System
This online User Guide explains how to set up, place and use the GlucoSensor Q Continuous Glucose Monitoring (CGM) System, connect your sensor to the GlucoSensor Q app, view glucose readings and trends, configure alerts and troubleshoot common issues.
GlucoSensor Q is an all-in-one CGM system. The sensor and transmitter are integrated into one compact device, so there is no separate transmitter to attach, charge or reuse. Each sensor can be worn for up to 14 days and sends a new glucose reading to the GlucoSensor Q app every three minutes.
Important
This online User Guide is intended to make the everyday use of GlucoSensor Q easier to understand. It does not replace the official Instructions for Use supplied with the product. Always read the current GlucoSensor Q Instructions for Use before using the system.
1. Before you start
GlucoSensor Q is intended for adults aged 18 years and older. It provides continuous glucose readings and glucose trend information to support glucose monitoring and diabetes management.
Before using GlucoSensor Q for the first time, read the official Instructions for Use and Quick Guide completely.
Before placing a sensor, make sure you have:
Your GlucoSensor Q all-in-one sensor applicator
A compatible smartphone with the GlucoSensor Q app installed
Bluetooth enabled
Internet access for app setup and account login
An alcohol wipe for preparing the sensor placement site
Check the product packaging and expiration date before use. Do not use the sensor if the packaging has been opened, damaged or otherwise compromised, or if the expiration date has passed.
No additional user training is required when the Instructions for Use and Quick Guide can be understood and followed.
2. Download the GlucoSensor Q app
Download the GlucoSensor Q app from the Apple App Store or Google Play Store.
Smartphone requirements
The current GlucoSensor Q Instructions for Use specify the following compatible operating systems:
Android 10 or later
iOS 15 or later
Your smartphone should have at least 4 GB of RAM and at least 1 GB of storage, and must support Bluetooth connectivity.
Use the GlucoSensor Q app only on a compatible, unmodified smartphone that meets the applicable operating requirements.
New versions of Android or iOS may require an update of the GlucoSensor Q app before compatibility is confirmed. Do not assume that a newly released operating-system version is automatically supported.
Bluetooth must remain enabled while using an active GlucoSensor Q sensor. Internet access is required during app setup and account registration and for certain online functions.
Keep the GlucoSensor Q app updated to the latest available version to support compatibility, performance and security.
3. Create or log in to your GlucoSensor account
If you already have a GlucoSensor account, log in using your existing email address and password.
If you do not yet have an account, select Create New Account and follow the registration instructions in the app. Review and accept the applicable Terms of Use and Privacy Policy during registration.
A GlucoSensor account can only be logged in on one smartphone at a time.
Keep your password and account credentials secure. Do not share your password with others and protect your smartphone using a passcode, fingerprint recognition, facial recognition or another appropriate device-security feature.
During setup, make sure you select the correct glucose measurement unit: mmol/L or mg/dL.
4. Set up your smartphone correctly
Before starting a sensor, check that your smartphone is configured correctly for the GlucoSensor Q app.
Make sure:
Bluetooth is enabled
The required Bluetooth and location permissions are enabled
Camera permission is enabled for scanning the sensor QR code
Notification permissions are enabled
The GlucoSensor Q app is allowed to run in the background
Battery-saving or power-optimisation settings are not restricting the app
Your smartphone volume and notification settings allow you to receive alerts
Do not routinely force-close the GlucoSensor Q app, as this may prevent alerts or background communication.
After restarting your smartphone or installing an operating-system update, reopen the GlucoSensor Q app and check that Bluetooth, notifications and the required permissions are still enabled.
5. Choose the sensor placement site
GlucoSensor Q can be placed on the back of the upper arm or abdomen.
When using the abdomen, place the sensor at least 5 cm away from the navel.
Choose an area with sufficient subcutaneous tissue and healthy, intact skin.
Avoid:
Damaged or irritated skin, including burns, wounds, ulcers or sunburn
Areas with severe scarring or hardened skin
Areas exposed to repeated pressure or friction
Areas close to infusion or injection sites
Tattoos
Moles
Areas with excessive body hair or skin irritation
Rotate sensor placement sites between sensor sessions to give the skin time to recover and help reduce irritation.
6. Prepare your skin
Wash your hands thoroughly and allow them to dry completely.
Clean the selected placement area with mild soap and water and dry the skin thoroughly. Do not use creams, oils, lotions or moisturisers on the placement site before placing the sensor.
Clean the area with an alcohol wipe and allow the skin to air dry completely before placing the sensor.
Proper preparation helps the adhesive attach securely to the skin.
7. Place the GlucoSensor Q sensor
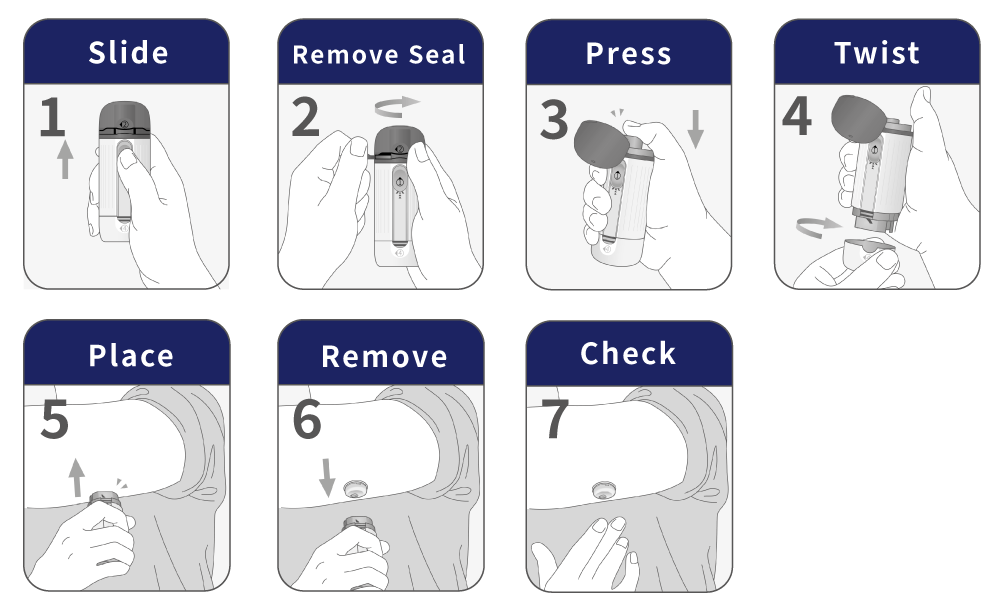
Follow these steps in the order shown:
- Slide the activation slider upward until it stops. Make sure it is fully pushed upward before continuing.
- Pull off and remove the plastic safety seal surrounding the upper cover.
- Open the upper cover and press the arming button downward until you hear a click.
- Twist the lower cover anticlockwise and remove it. Do not press the applicator against your skin yet.
- Position the applicator firmly against the selected placement site and press it against the skin until you hear a click.
- Gently lift the applicator away from the skin.
- Press carefully around the adhesive patch to make sure the sensor is securely attached.
If you have oily skin, sweat heavily, exercise frequently or want extra adhesion during daily activities, an adhesive overpatch can be used to help keep the sensor securely in place.
8. Connect your sensor to the GlucoSensor Q app
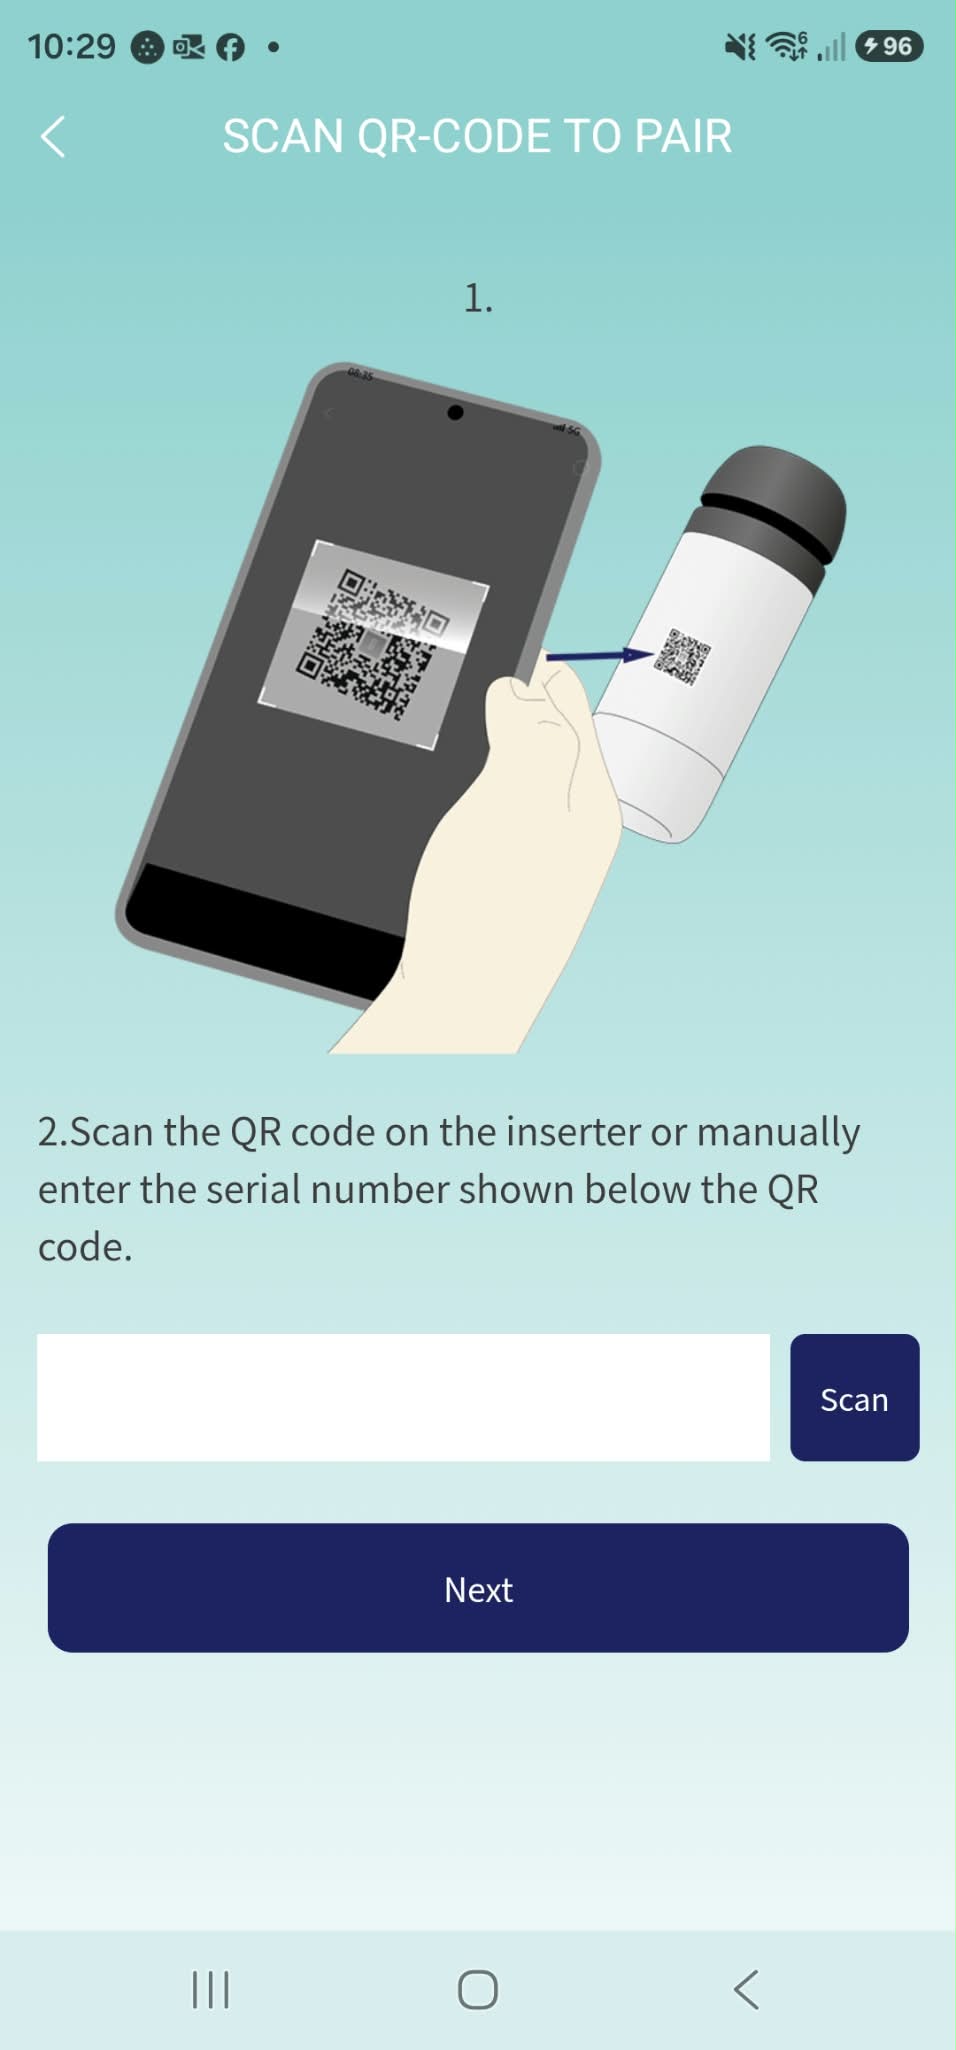
After placing the sensor, open the GlucoSensor Q app and select Pair.
Scan the QR code on the back of the sensor applicator using your smartphone camera. Make sure camera permission is enabled for the GlucoSensor Q app.
If you cannot scan the QR code, manually enter the Sensor Serial Number (SN) printed below the QR code on the applicator.
Before pairing, make sure that the sensor has been correctly placed and activated.
If the sensor does not pair:
Check that the QR code or Sensor Serial Number belongs to the current sensor.
Make sure Bluetooth is enabled.
Keep your smartphone within Bluetooth communication range of the sensor.
If the sensor was previously paired, remove the existing Bluetooth connection from your smartphone settings and try pairing again.
Restart your smartphone and reopen the GlucoSensor Q app if necessary.
Do not discard the applicator immediately after pairing. Keeping it during the active sensor session gives you access to the QR code and Sensor Serial Number if these are needed later.
If pairing still fails, contact GlucoSensor Customer Support.
9. Sensor warm-up
After the sensor has been placed and connected, GlucoSensor Q requires a warm-up period of approximately 60 minutes.
Glucose readings are not available during the warm-up period.
Once warm-up is complete, glucose values will begin to appear automatically in the GlucoSensor Q app and will update every three minutes.
You do not need to calibrate GlucoSensor Q manually.
10. Understanding the Home screen
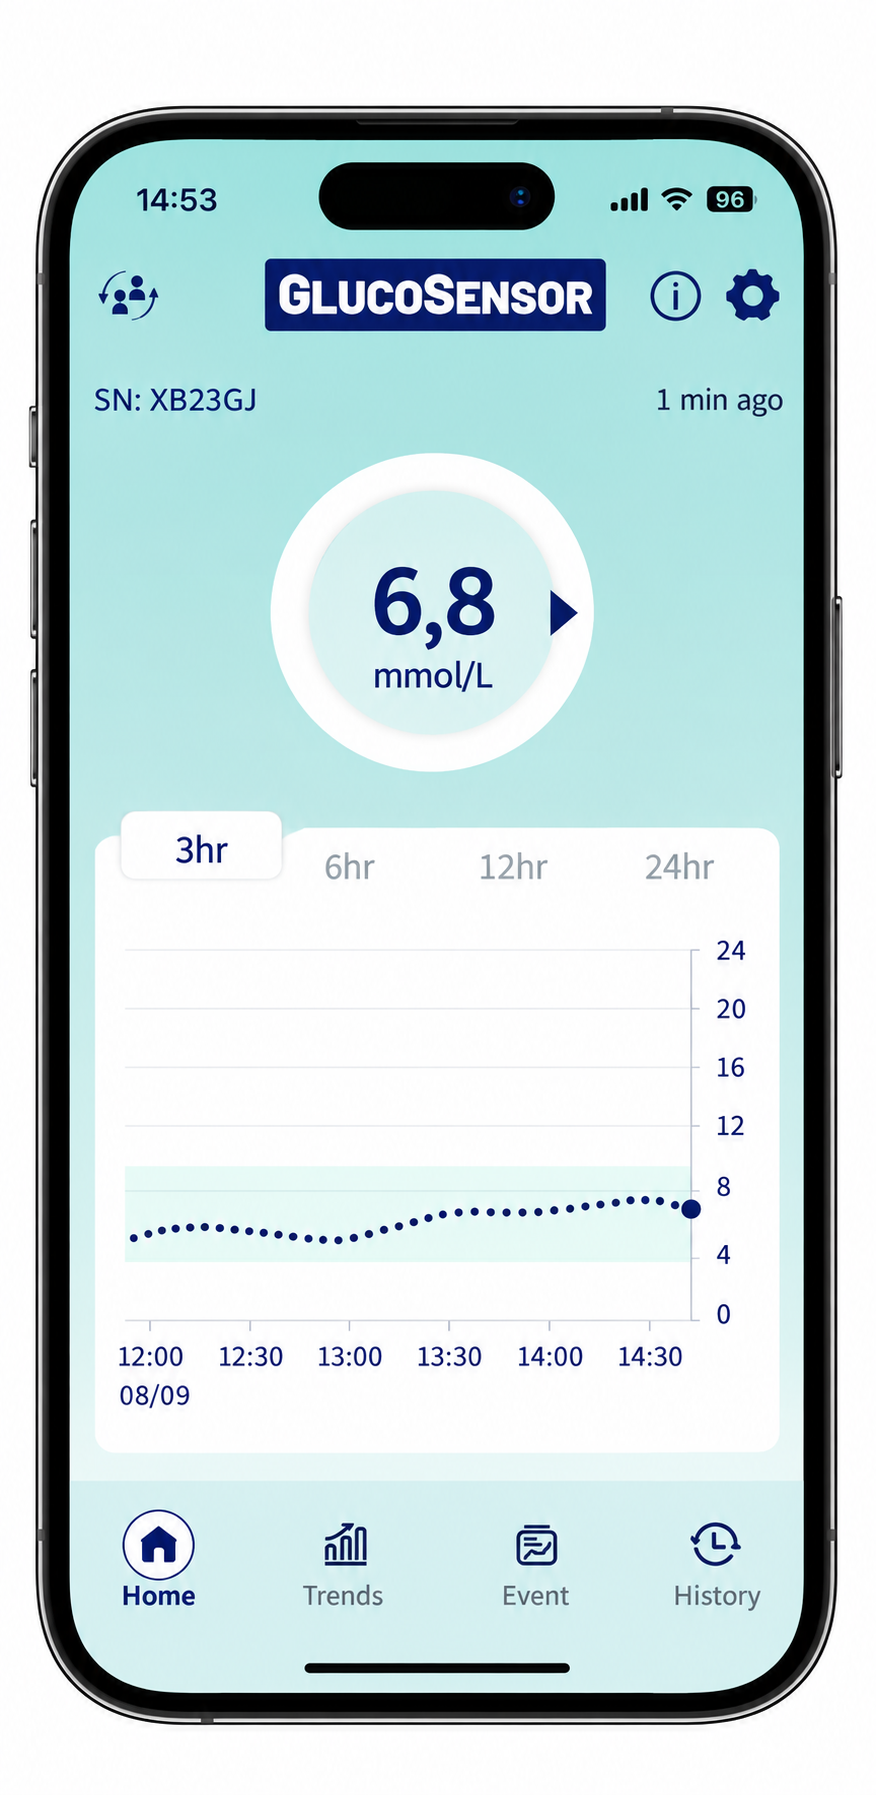
The Home screen provides an overview of your current sensor glucose information and recent glucose trends.
The glucose value shown in the central circle represents your current sensor glucose reading and is updated every three minutes.
The glucose graph shows how your glucose has changed over time. You can select different time periods, including 3, 6, 12 and 24 hours, to review recent glucose data and trends.
You can scroll through the graph to view individual data points together with the corresponding glucose value and measurement time.
A trend arrow provides additional information about the direction in which your glucose is moving.
Do not focus only on a single glucose value. The current reading, trend arrow and glucose graph together provide a more useful picture of how your glucose is changing.
11. CGM glucose and blood glucose are not exactly the same
GlucoSensor Q measures glucose in interstitial fluid, rather than directly in the bloodstream.
Glucose therefore takes some time to move from the bloodstream into the interstitial fluid. This can create a natural delay between a CGM reading and a blood glucose meter reading, especially when glucose is changing rapidly after food, exercise or insulin.
This physiological delay is commonly approximately 5 to 15 minutes, although it varies between individuals and according to how quickly glucose is rising or falling.
The official Instructions for Use also note that sensor glucose and blood glucose may differ particularly during periods of rapid glucose change.
If your GlucoSensor Q reading does not match how you feel or what you expect, verify your glucose using a blood glucose meter before making treatment decisions.
12. Glucose alerts
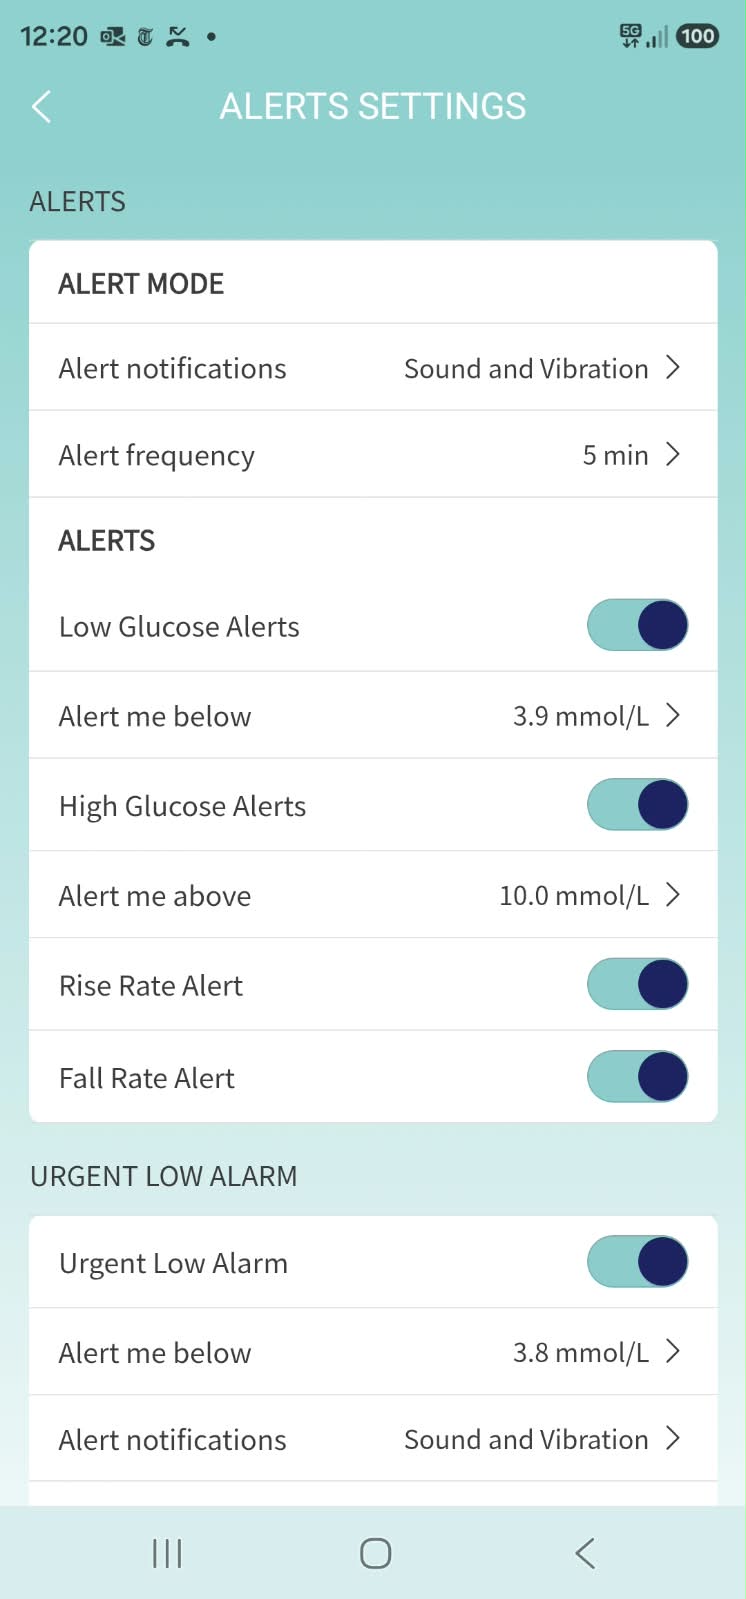
The GlucoSensor Q app allows you to configure glucose alerts and notification preferences.
Available alert settings may include:
Low glucose alerts
High glucose alerts
Rise rate alerts
Fall rate alerts
Urgent low glucose alarms
Alert sound and vibration settings
Alert frequency settings
You can adjust glucose thresholds according to your personal preferences or the recommendations of your healthcare professional.
To receive alerts reliably:
Keep Bluetooth enabled.
Keep your smartphone within communication range of the sensor.
Allow the GlucoSensor Q app to run in the background.
Do not routinely force-close the app.
Enable notification permissions.
Make sure your smartphone is switched on and sufficiently charged.
Check that volume and sound settings are configured appropriately.
When using headphones, external audio devices or connected devices such as smartwatches, check how alerts are delivered and make sure important alerts remain noticeable.
Alerts cannot be displayed on your smartphone while communication with the sensor is interrupted.
13. What happens if your smartphone goes out of range?
If your smartphone moves outside the Bluetooth communication range of the GlucoSensor Q sensor, the connection may be temporarily interrupted and new glucose readings or alerts may not appear in the app.
The GlucoSensor Q app will first try to restore the Bluetooth connection automatically when your smartphone is back within range of the sensor.
If the connection is not restored automatically, a Reconnect button will appear on the Home screen of the app. Tap Reconnect to make your smartphone actively search for the sensor and restore the connection.
Once the connection has been restored, glucose data collected during the interruption may synchronise with the app.
Keep Bluetooth enabled and your smartphone reasonably close to the sensor whenever possible, especially if you rely on glucose alerts.
14. What happens if my smartphone is switched off or the battery runs out?
If your smartphone is switched off or runs out of battery, the GlucoSensor Q app cannot display new glucose readings or provide alerts during that period.
The sensor itself continues its active sensor session. Once your smartphone is switched back on and the Bluetooth connection with the sensor is restored, stored glucose data may synchronise with the app if data was collected during the interruption.
Keep your smartphone powered on, sufficiently charged and within Bluetooth communication range whenever possible, especially if you rely on glucose alerts.
15. Using GlucoSensor Q without an internet connection
An internet connection is required to log in to the GlucoSensor Q app and for certain online functions.
Once you are logged in and an active GlucoSensor Q sensor is connected, the sensor communicates directly with your smartphone via Bluetooth. This means you can continue to view your glucose readings without an internet connection, as long as Bluetooth remains enabled and the sensor stays within communication range.
Some functions, such as account services, data sharing or other online features, may not be available until an internet connection is restored.
During a flight
GlucoSensor Q can continue to function during a flight. Put your smartphone in airplane mode and then switch Bluetooth back on, provided Bluetooth use is permitted by the airline.
Always follow the instructions of the airline and cabin crew regarding electronic devices.
Airport security screening
The Instructions for Use allow screening using:
Hand-held metal detectors
Pat-down inspection
Visual inspection
Walk-through metal detectors
Avoid advanced imaging technology (AIT) body scanners, including millimetre-wave scanners.
Do not place unused GlucoSensor Q sensors or applicators through X-ray screening equipment.
If additional screening is required, inform security personnel that you are wearing or carrying a continuous glucose monitoring device.
16. Changing smartphones during an active sensor session
You can continue using an active GlucoSensor Q sensor after changing smartphones, but the sensor must be paired with the new phone.
Install the GlucoSensor Q app on the new smartphone, log in to your GlucoSensor account and make sure Bluetooth and the required app permissions are enabled.
To pair the active sensor with the new smartphone, scan the QR code on the original sensor applicator.
If the applicator has already been discarded, open the GlucoSensor Q app on your old smartphone and note the Sensor Serial Number shown in the upper-left corner of the Home screen. During pairing on the new smartphone, enter this serial number manually instead of scanning the QR code.
A GlucoSensor account can only be logged in on one smartphone at a time.
If the sensor does not connect, restart the new smartphone, reopen the app and try pairing again. If the problem continues, contact GlucoSensor Customer Support.
17. Trends and glucose reports
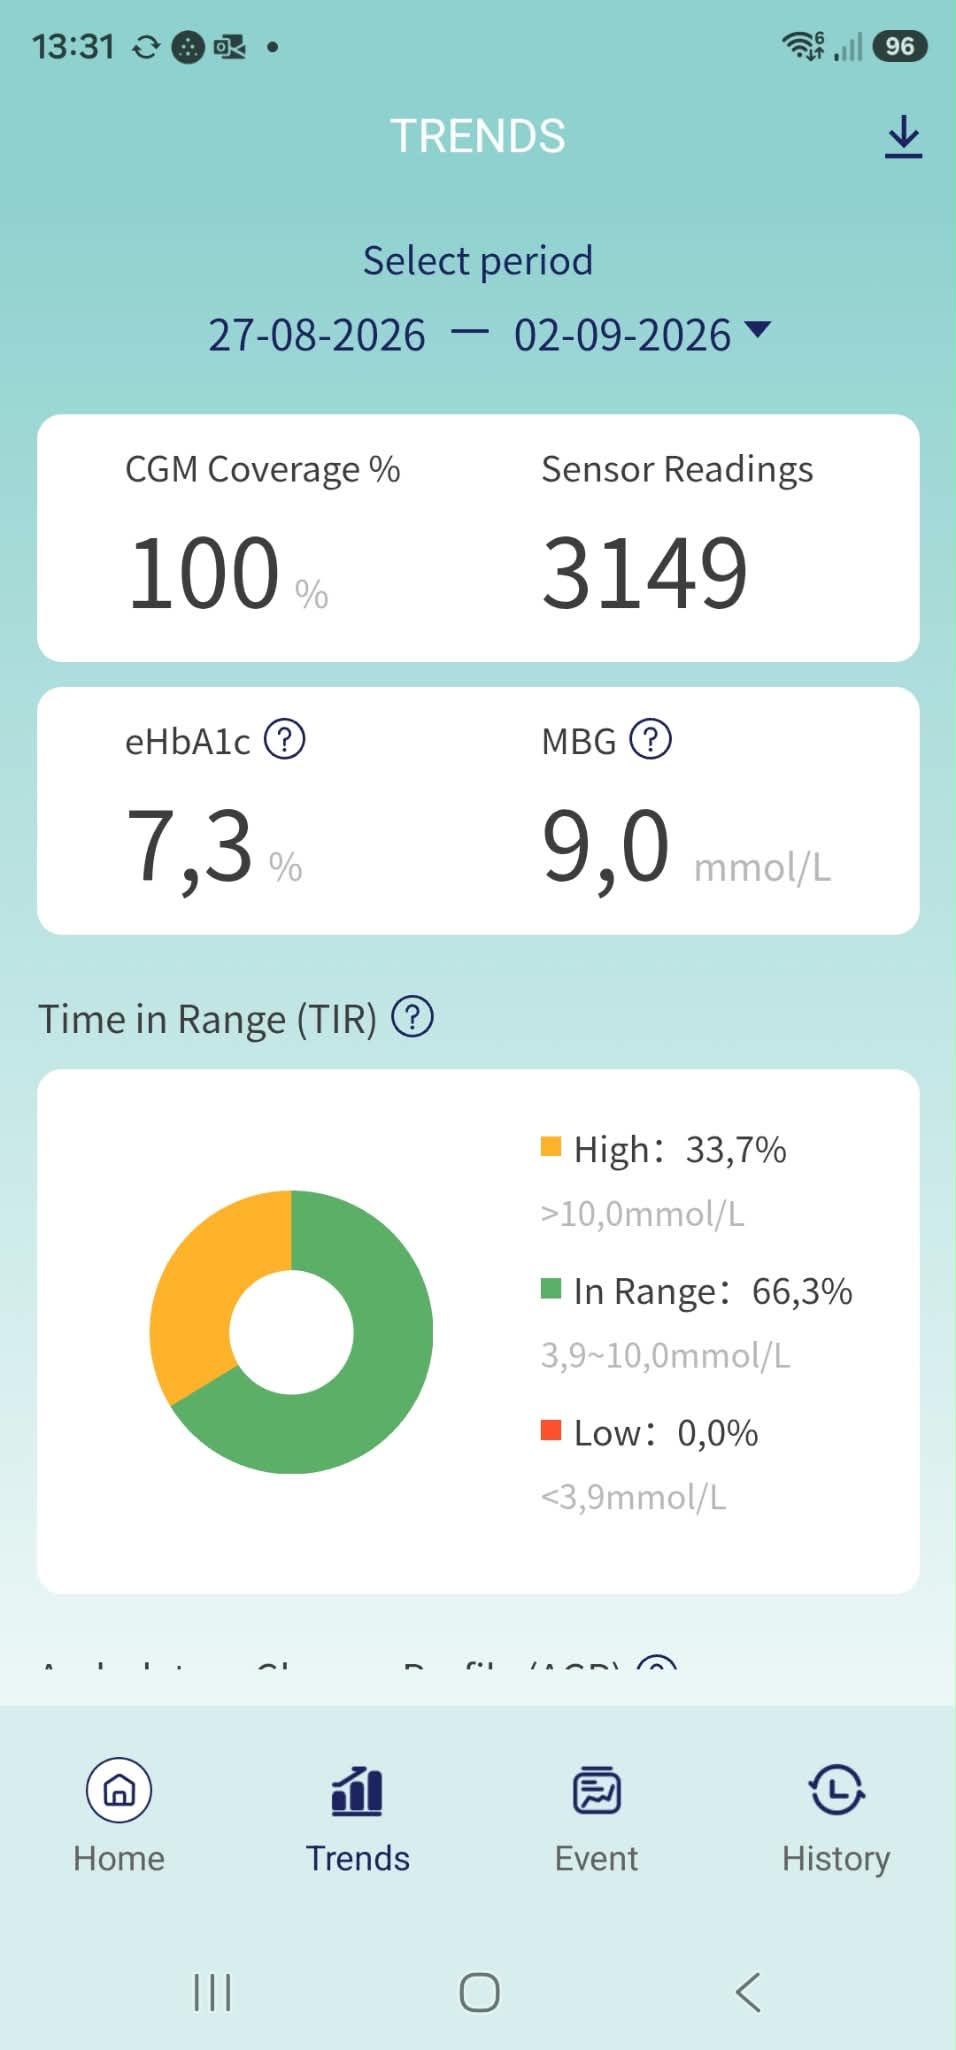
The Trends section gives you a broader view of your glucose data over time.
Depending on the selected period, the GlucoSensor Q app can display information such as Mean Blood Glucose, Estimated HbA1c, Time in Range, Ambulatory Glucose Profile (AGP), multi-day glucose profiles and Low Blood Glucose Index. Reports can also be generated for selected analysis periods.
These views can help identify recurring glucose patterns and understand how glucose changes over days rather than focusing only on individual readings.
When GlucoSensor Q is used for diabetes management, discuss the interpretation of glucose reports and treatment-related decisions with your healthcare professional.
18. Record meals, exercise and other events
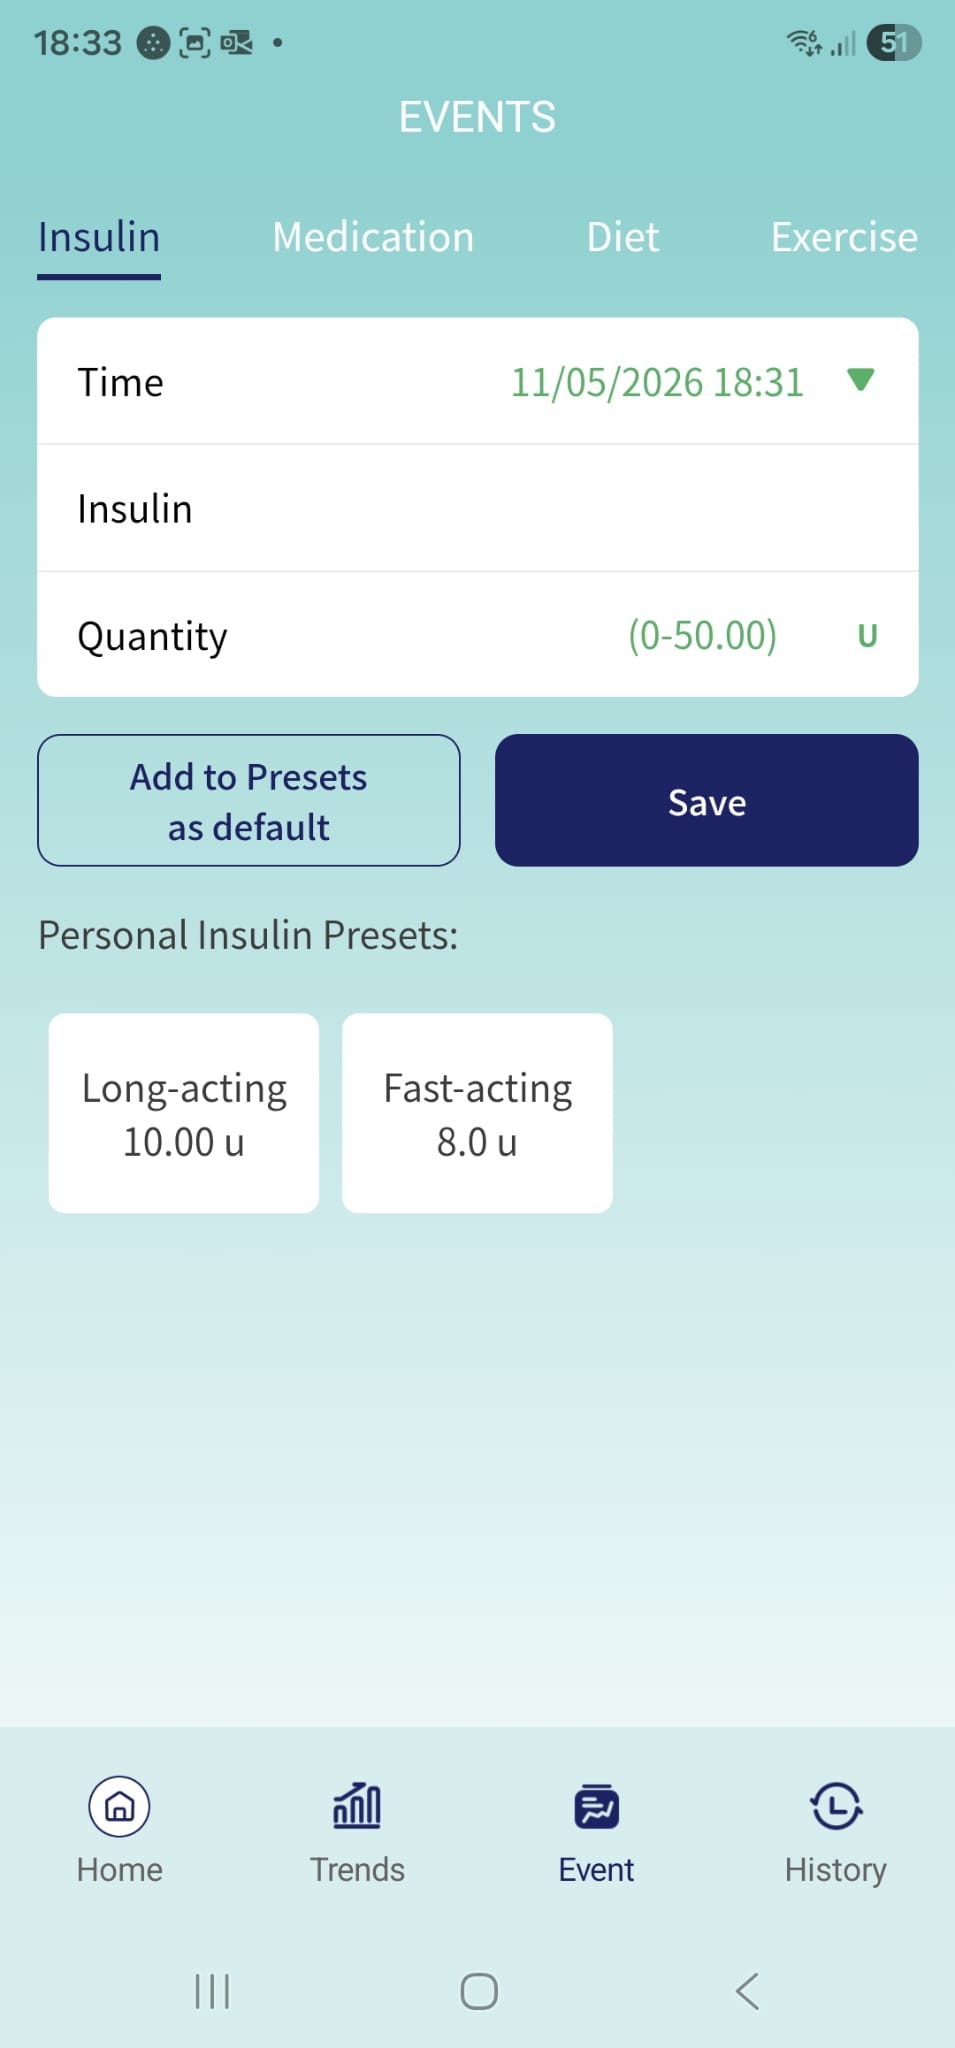
The GlucoSensor Q app allows you to record daily activities and other events that may be relevant to your glucose patterns.
You can record events such as:
Meals and dietary information
Exercise and physical activity
Medication intake
Insulin administration
Depending on the event, you can enter information such as the date, time, type of event and quantity or dose where applicable.
Frequently used entries can be saved as personal presets for faster event logging.
Recorded events can help you and your healthcare professional review glucose patterns and better understand the potential relationship between daily activities and glucose trends.
19. History
The History section gives you a chronological overview of previous glucose alerts, system notifications and recorded events.
This may include high and low glucose alerts, glucose trend alerts, sensor notifications and events you have recorded for meals, exercise, medication or insulin.
Use History to review what happened at a particular time and compare events with your glucose data.
20. Share & Follow
The Share & Follow function allows you to share glucose information with other authorised users, including family members, caregivers or healthcare professionals.
You can add followers, manage shared connections, remove followers and view accounts you follow.
Shared information may include glucose readings, glucose trends, alerts and related glucose data.
Shared glucose information may not always be displayed instantly. Update timing can depend on the smartphone connection, internet availability and app synchronisation.
The GlucoSensor Q app also includes an Automatic Report Generator (ARG). This allows you to create a PDF report for a selected period containing glucose data, trends and other relevant information.
You can share this PDF report yourself with your healthcare professional, for example by email or another method of your choice.
Sharing functions are intended as an additional way to review and share glucose information and should not be relied upon for emergency monitoring or immediate medical assistance.
21. Units
GlucoSensor Q supports glucose display in mmol/L and mg/dL.
Make sure the correct unit is selected because glucose values, graphs and alerts are displayed according to this setting.
You can change your glucose unit through Settings > Units.
Take particular care when discussing glucose readings with someone who uses a different measurement unit.
22. Showering and swimming
GlucoSensor Q is water-resistant and can be worn during normal daily activities such as showering and swimming.
The sensor has an IP27 rating and can withstand temporary immersion in water up to 1 metre deep for a maximum of 30 minutes.
Avoid prolonged water exposure, greater depths and environmental conditions outside the operating limits of the sensor.
Chlorinated water, including swimming pools and jacuzzis, may weaken the adhesive over time and increase the risk of the sensor becoming loose or detached.
Using an adhesive overpatch can provide additional support, particularly during swimming or other water activities.
After swimming or showering, gently dry the sensor and surrounding skin and check that the sensor remains securely attached.
If the sensor does not function correctly after water exposure, dry the area thoroughly and check that the sensor remains securely attached. If the problem continues for more than one hour, stop the current sensor session, remove the sensor and place a new sensor.
23. Exercise and sport
GlucoSensor Q can be worn during normal exercise, sports and physical activity.
Before exercising, check that the sensor is securely attached.
Sweating, repeated movement, friction from clothing or sports equipment and physical impact can place additional stress on the sensor adhesive. An adhesive overpatch can provide additional support during intensive activity.
Avoid repeatedly pressing, rubbing, hitting or placing direct pressure on the sensor.
Glucose can change rapidly during and after exercise. Sensor glucose readings and blood glucose values may therefore temporarily differ more than usual during periods of rapid glucose change.
Use GlucoSensor Q to observe glucose trends and patterns, but if a reading does not match how you feel or what you expect, verify your glucose with a blood glucose meter before making treatment decisions.
24. Sleeping with GlucoSensor Q
GlucoSensor Q can remain in place while you sleep.
Choose a placement site where the sensor is unlikely to be subjected to prolonged direct pressure while lying down. Pressure on a CGM sensor may temporarily affect readings in some situations.
If you receive an unexpected low glucose reading while lying directly on the sensor, change position and review the glucose trend. If the reading does not match how you feel or what you expect, confirm your glucose with a blood glucose meter.
25. What should I do if the sensor becomes partially detached?
If only the edges of the adhesive begin to lift, apply an adhesive overpatch or suitable medical tape to help keep the sensor securely in place.
If the sensor itself has moved, become significantly loose or is no longer correctly positioned, do not push it back into the skin and do not attempt to reposition it.
Remove the sensor and start a new sensor session with a new GlucoSensor Q sensor.
A sensor that has been removed or detached cannot be reapplied, repositioned or reused.
Premature detachment caused or materially contributed to by external factors such as impact, friction, clothing, sport, sweating, prolonged water exposure, chlorine or incorrect placement will not normally qualify for free replacement.
If you believe the sensor became detached because of a product or adhesive defect, contact GlucoSensor Customer Support. Any replacement request will be assessed according to the GlucoSensor Q Sensor Replacement Policy.
26. Bleeding after sensor placement
A small amount of bleeding can occasionally occur during sensor placement if a small blood vessel is touched.
Gently clean any blood around the sensor placement area without rubbing or pressing on the site.
According to the GlucoSensor Q Instructions for Use, if bleeding occurs at the sensor placement site, remove and discard the sensor.
Check the skin for continued bleeding or irritation before placing a new sensor at a different approved placement site.
Do not attempt to reinsert or reuse the removed sensor.
If bleeding continues, is unusually heavy or the area becomes painful, swollen or irritated, seek medical advice.
27. Skin irritation or discomfort
A GlucoSensor Q sensor should not remain painful or cause significant discomfort during use.
If the placement site becomes painful, increasingly red, swollen or irritated, remove the sensor and place a new sensor at a different approved placement site after checking that the skin is suitable.
Avoid areas exposed to friction, bending, pressure or tight clothing. Do not place a new sensor on irritated, scarred, hardened or damaged skin.
Some users may also experience skin irritation or an allergic reaction to the sensor adhesive, an overpatch or medical tape.
If pain or irritation continues after removing the sensor, or if you notice swelling, discharge, ulceration or signs of infection, consult a healthcare professional.
If you suspect a significant allergic reaction, discontinue use and seek appropriate medical advice.
28. What if the sensor filament remains under the skin?
If a sensor filament appears to remain under your skin after the sensor is removed, do not try to remove or reinsert it yourself.
Seek medical attention as appropriate, particularly if you experience persistent pain, inflammation or signs of infection. The current Instructions for Use specifically advise users not to handle or reinsert a broken sensor filament.
Contact GlucoSensor Customer Support so the incident can also be documented.
29. What if the applicator is difficult to remove?
After placement, gently pull the applicator straight upward while holding the sensor adhesive against the skin.
Do not force, dismantle or reuse the applicator.
If the applicator cannot be safely removed, contact GlucoSensor Customer Support.
30. What should I do if no glucose readings appear after the warm-up period?
If no glucose readings appear after the approximately 60-minute warm-up period, first check that Bluetooth is enabled and that your smartphone is within communication range of the sensor.
Make sure the GlucoSensor Q app is running correctly and check the connection status on the Home screen.
The app will first try to restore the connection automatically. If this does not work and a Reconnect button appears on the Home screen, tap Reconnect to make your smartphone actively search for the sensor.
If necessary, close and reopen the app or restart your smartphone.
Do not immediately replace the sensor because a temporary communication interruption does not necessarily mean that the sensor has failed.
If glucose readings still do not appear, contact GlucoSensor Customer Support.
31. What should I do if the app shows a Sensor Error or Connection Warning?
A Connection Warning does not automatically mean that the sensor needs to be replaced.
First check that Bluetooth is enabled and that your smartphone is within communication range of the sensor. The app will try to restore the connection automatically.
If the connection is not restored automatically, use the Reconnect button on the Home screen. If necessary, close and reopen the GlucoSensor Q app or restart your smartphone.
If a sensor error continues, follow the instructions displayed in the app.
If the app displays Replace Sensor, stop the current sensor session and place a new sensor.
32. What should I do if the GlucoSensor Q app stops working or closes unexpectedly?
First close and reopen the GlucoSensor Q app.
If the problem continues, restart your smartphone and check whether an update is available for the GlucoSensor Q app.
Make sure Bluetooth is enabled and verify that the app has the required permissions for Bluetooth, notifications and background operation. Also check that battery-saving or power-optimisation settings are not restricting the app.
If the problem remains, delete and reinstall the latest version of the GlucoSensor Q app and log in again.
If you are using an active sensor, do not immediately start a new sensor because an app problem does not necessarily mean that the sensor has failed.
Contact GlucoSensor Customer Support if the issue continues.
33. What should I do if my glucose data is not synchronising correctly?
If online or account data is not synchronising correctly, first make sure your smartphone has a stable Wi-Fi or mobile-data connection.
If current sensor readings are missing, also check that Bluetooth is enabled and that your smartphone is within communication range of the active sensor.
Then follow these steps:
1. Close and reopen the GlucoSensor Q app.
2. Check Bluetooth and confirm that the sensor connection is active.
3. Check for an app update in the Apple App Store or Google Play Store.
4. Restart your smartphone and reopen the app.
Temporary data gaps can occur if Bluetooth communication between the sensor and smartphone is interrupted. Once the connection has been restored, stored glucose data may automatically synchronise if data was collected during the interruption.
If synchronisation still does not work, contact GlucoSensor Customer Support and provide your smartphone model, operating-system version, app version and any error message displayed.
34. What does “Replace Sensor” mean?
If the GlucoSensor Q app displays Replace Sensor, the current sensor can no longer be used and should be replaced with a new GlucoSensor Q sensor.
Remove the current sensor, place and activate a new sensor, and start a new sensor session.
If Replace Sensor appears before the end of the intended 14-day wear period, the sensor may qualify for replacement under the GlucoSensor Q Sensor Replacement Policy.
Replacement requests are assessed individually and may require information such as the sensor serial number, activation date, screenshots or error messages.
35. When should the sensor be replaced?
Each GlucoSensor Q sensor can be worn for up to 14 days.
The app shows the active sensor’s expiration date and time. When the sensor reaches the end of its wear period, its status changes to Expired and a new sensor must be placed to continue glucose monitoring.
Replace the sensor earlier if:
The app displays Replace Sensor.
The sensor becomes loose, detached or damaged.
Sensor placement or activation fails.
Significant skin irritation or discomfort occurs.
The sensor no longer functions correctly after troubleshooting.
Glucose readings remain inaccurate or inconsistent with your symptoms after checking your glucose with a blood glucose meter and completing the relevant troubleshooting steps.
A temporary Bluetooth interruption, an isolated missing reading or an unexpected glucose value does not automatically mean that the sensor needs to be replaced. Follow the troubleshooting guidance first.
Once a sensor has been removed, it cannot be reinserted, repositioned, reactivated or reused.
36. Can I start a new sensor before the current sensor expires?
Yes. You can end the current sensor session and start a new GlucoSensor Q sensor before the current sensor reaches the end of its 14-day wear period.
Once the current sensor has been removed, it cannot be reinserted, reactivated or reused.
If you voluntarily remove a correctly functioning sensor before the end of its intended wear period, this does not normally qualify the sensor for free replacement under the GlucoSensor Q Sensor Replacement Policy.
37. Removing the sensor
At the end of the sensor session, carefully lift one edge of the adhesive and slowly peel the sensor away from your skin.
If necessary, an appropriate adhesive remover can make removal more comfortable.
Do not pull the sensor away abruptly.
After removal, gently clean any adhesive residue from the skin.
If you notice persistent pain, redness, swelling, discharge or signs of infection after sensor removal, consult a healthcare professional.
38. No calibration required
GlucoSensor Q does not require calibration, and manual calibration by the user is not possible.
The sensor automatically provides glucose readings throughout its wear period. You do not need to enter finger-prick blood glucose values into the GlucoSensor Q app to calibrate the sensor.
If a GlucoSensor Q reading differs from a blood glucose meter reading, allow some time for the sensor readings to stabilise. Temporary differences can occur, particularly shortly after placing a new sensor or when your glucose level is rising or falling rapidly.
GlucoSensor Q measures glucose in interstitial fluid, while a blood glucose meter measures glucose directly in the blood. Because glucose moves from the bloodstream into the interstitial fluid with a natural delay, CGM readings may lag behind blood glucose values by approximately 5 to 15 minutes. The exact delay varies between individuals and can also depend on how quickly glucose is changing.
If the difference is larger than expected, wait a short while and check the glucose trend in the GlucoSensor Q app. Also make sure that the sensor is securely attached and has been placed according to the sensor placement instructions.
If a GlucoSensor Q reading does not match how you feel or what you expect, verify your glucose with a blood glucose meter before making treatment decisions.
If significant differences continue, consult the GlucoSensor Q Instructions for Use or contact GlucoSensor Customer Support. Seek advice from a healthcare professional when appropriate.
39. Medical procedures
Do not wear or use the GlucoSensor Q sensor during an MRI examination, diathermy treatment, electrocautery or electrosurgical procedure.
CT procedures may affect device performance. Follow the instructions of medical staff and keep the sensor outside the scanned area whenever possible.
Tell your healthcare provider that you are wearing a continuous glucose monitoring sensor before undergoing a medical procedure.
40. Insulin pumps and other connected medical devices
GlucoSensor Q is designed to operate as a standalone continuous glucose monitoring system.
GlucoSensor Q is not intended to be connected to or used as part of an insulin pump system.
Do not use GlucoSensor Q with automated insulin dosing (AID) systems, closed-loop systems or insulin-suspension systems unless such use has been expressly authorised by the manufacturer.
Do not use unauthorised third-party software to interpret GlucoSensor Q data or guide insulin dosing decisions.
If you use an insulin pump independently from GlucoSensor Q, discuss with your healthcare professional how CGM information should be used in your diabetes management.
GlucoSensor Q does not directly control or communicate with an insulin pump.
Compatibility with every other medical device has not been established.
41. Pacemakers, dialysis, anticoagulants and pregnancy
The GlucoSensor Q CGM System has not been evaluated for use in:
Pregnant women
Patients undergoing peritoneal dialysis
Patients with implanted pacemakers
Patients with coagulation disorders
Patients receiving anticoagulant therapy
Consult a healthcare professional before using GlucoSensor Q if you are undergoing dialysis, have an implanted pacemaker or another implanted medical device, have a bleeding or blood-clotting disorder, receive anticoagulant treatment or have an increased risk of bleeding.
You should also consult a healthcare professional before use if you have a severe skin condition, allergies to disinfectants or medical adhesives, or diffuse subcutaneous nodules.
GlucoSensor Q has not been evaluated for use during pregnancy or for gestational diabetes.
If you are pregnant, have pre-existing diabetes during pregnancy or are being monitored for gestational diabetes, consult your healthcare professional before using GlucoSensor Q.
Pregnancy-related glucose monitoring and treatment should always be managed according to the recommendations of your healthcare professional. GlucoSensor Q should not replace pregnancy-specific medical care or clinically recommended glucose monitoring.
42. Medicines, supplements and other treatments
Medicines, supplements, medical treatments and other physiological factors can affect glucose levels, and some substances may also affect the performance of glucose-monitoring systems.
If you start a new medicine or supplement and notice unexpected GlucoSensor Q readings, consider the glucose trend together with how you feel.
If a reading does not match your symptoms or expectations, verify your glucose using a blood glucose meter before making treatment decisions.
For information about medicines or substances that may specifically affect GlucoSensor Q, always refer to the current Instructions for Use and consult your healthcare professional if necessary.
43. Operating conditions
Use GlucoSensor Q only within the specified operating conditions.
The sensor is designed to operate at:
Temperature: 5°C to 40°C
Relative humidity: 10% to 90%
Atmospheric pressure: 700 to 1060 hPa
Avoid prolonged exposure to extreme heat, freezing conditions or direct sunlight.
Very hot environments such as saunas, steam rooms or hot tubs may exceed the permitted operating conditions. Excessive heat, steam and prolonged water exposure may also affect sensor adhesion.
Avoid using GlucoSensor Q in these environments where the permitted operating conditions may be exceeded.
If the sensor has been exposed to conditions outside the specified operating range and the readings no longer match how you feel or what you expect, verify your glucose with a blood glucose meter before making treatment decisions.
44. Storage before use
Store and transport unused GlucoSensor Q sensors within the specified conditions:
Temperature: 2°C to 30°C
Relative humidity: 10% to 90%
Atmospheric pressure: 700 to 1060 hPa
Keep sensors in their original unopened packaging in a cool, dry, clean and well-ventilated environment.
Protect them from direct sunlight, excessive heat, moisture, heavy pressure and corrosive gases.
Do not freeze the sensor.
Do not use a sensor after the expiration date printed on the packaging.
Do not use the product if the packaging has been opened, damaged or otherwise compromised.
45. Maintenance
GlucoSensor Q is maintenance-free.
The sensor and applicator are sterile, single-use components. No cleaning, disinfection, charging or routine maintenance is required.
Do not dismantle, modify, repair or reuse the sensor or applicator.
There is no separate reusable transmitter to clean, charge or maintain.
The GlucoSensor Q app may receive software updates to improve functionality, performance or security. Install updates when prompted.
If an app update fails or the app does not function correctly afterwards, restart your smartphone. If necessary, reinstall the latest version of the GlucoSensor Q app.
46. Disposal
Dispose of used GlucoSensor Q sensors, applicators and related components according to applicable local regulations for electronic devices, batteries, sharps and biohazardous or medical waste.
Used sensors and applicators may contain biological material and should be handled carefully.
Where available or required by local regulations, use an approved sharps or medical-waste container.
For the sensor applicator, replace the protective cap after use where applicable to help prevent accidental needle injuries.
Do not dismantle or reuse the sensor or applicator before disposal.
The GlucoSensor Q sensor contains a non-replaceable battery. Do not incinerate the sensor or expose it to excessive heat.
If you are unsure how to dispose of GlucoSensor Q components in your area, follow the instructions of your local healthcare or waste-management authority.
47. Important medical and safety information
Always use GlucoSensor Q in accordance with the current official Instructions for Use.
GlucoSensor Q provides continuous glucose information to support glucose monitoring and the understanding of glucose values, trends and patterns.
Always consider your symptoms together with CGM readings.
If a GlucoSensor Q reading does not match how you feel or what you expect, verify your glucose with a blood glucose meter before making treatment decisions.
During periods of rapid glucose change, sensor glucose readings may temporarily differ from blood glucose values.
Dehydration may affect sensor performance and glucose readings.
Do not use a damaged or malfunctioning sensor or applicator.
Keep GlucoSensor Q components out of reach of children. Small parts may present a choking hazard.
Seek immediate medical attention if you experience symptoms of severe hypoglycaemia or hyperglycaemia.
GlucoSensor Q does not replace professional medical judgement, diagnosis, emergency medical care or advice from your healthcare professional.
For complete warnings, precautions, contraindications, limitations and technical information, always refer to the current official GlucoSensor Q Instructions for Use.
Download the official Instructions for Use
48. Reporting a serious incident
Any serious incident related to the GlucoSensor Q CGM System should be reported in accordance with applicable European medical device requirements.
A serious incident includes an incident that directly or indirectly caused, might have caused or might lead to:
The death of a patient, user or another person, or
A temporary or permanent serious deterioration in a person’s state of health.
Serious incidents should be reported to the manufacturer, EU authorised representative, EU importer and the competent authority of the EU Member State in which the user is established, as applicable.
For assistance with reporting a serious incident, contact GlucoSensor Customer Support at support@glucosensor.com.
49. Need help?
If you experience a problem with your GlucoSensor Q sensor, app or Bluetooth connection, first review the troubleshooting information in this User Guide and the official Instructions for Use.
If the problem continues, contact:
GlucoSensor Customer Support
support@glucosensor.com
To help us investigate your issue as quickly as possible, have the following information available where relevant:
Your order number
The email address associated with your GlucoSensor account
The Sensor Serial Number
The lot or batch information, if requested
The sensor activation date
The date and approximate time the problem occurred
A clear description of what happened
Your smartphone model
Your Android or iOS version
Your GlucoSensor Q app version
Any error message displayed in the app
Screenshots showing the problem
Photographs of the sensor, applicator or packaging where relevant
The sensor placement site
Relevant information about skin preparation, overpatch use, physical activity, water exposure or impact
Troubleshooting steps you have already completed
For sensor errors or replacement requests, Customer Support may request additional information needed to investigate the issue or assess replacement eligibility.
Do not discard a potentially defective sensor, its applicator or packaging until Customer Support has confirmed that they are no longer required.
50. Official GlucoSensor Q documents
For complete product, safety and legal information, refer to the current GlucoSensor Q documentation:
GlucoSensor Q Instructions for Use
GlucoSensor Q Quick Guide
Sensor Replacement Policy
Privacy Policy
End-User Licence Agreement (EULA)
Legal Disclaimer
General Delivery Terms
The official Instructions for Use supplied with the product or made available by GlucoSensor contain the complete warnings, precautions, contraindications and technical information applicable to GlucoSensor Q.
51. Manufacturer and regulatory information
Manufacturer
Dreisam (Beijing) Medical Technology Co., Ltd.
Room No. 101, 1F, Building No. 9, Zone 1, Court No. 7, Liangshuihe 1st Street
Beijing Economic and Technological Development Zone
Beijing, China
European Authorised Representative
Firsteck Bio S.r.l.
Via Salvatore Quasimodo 36/38
40013 Castel Maggiore (BO)
Italy
EU Importer
Maralvion sp. z o.o.
Pl. Władysława Andersa 3, 11th Floor
61-894 Poznań
Poland
GlucoSensor Customer Support
support@glucosensor.com
www.glucosensor.com/support